How to dramatically increase the battery life of your Kameleon Remote Control
PLEASE READ THIS WEBPAGE IN FULL BEFORE MAKING ANY ALTERATIONS.
I made a brief post many moons ago on some forum about how to disable the motion sensor on the Kameleon Remote Controls. Subsequently, I received many emails asking me for more details on this.
PLEASE NOTE
I DO **NOT** TAKE RESPONSIBILITY FOR ANY DAMAGE THAT YOU MAY CAUSE TO YOUR KAMELEON REMOTE CONTROL SHOULD YOU CHOOSE TO PERFORM ANY OF THE FOLLOWING ACTIONS !
One of the main problems with this excellent remote control if it is far too sensitive and it lights up with the least vibration, so much so, it drastically reduces battery life. I think I used to get 1-2 months before my batteries needed changing.
I made the change I am about to describe to my Kameleon 8060 and my battery life has dramatically improved. In fact, I can't remember when I last changed the batteries (12 months+).
The kameleon has a built-in vibration sensor that I disabled. This means it ONLY lights up WHEN you push a button. It stays lit for the usual 5 seconds or so, before going out again. It's a much better solution than the frequent battery changes !
So.......................
Here's what to do...............
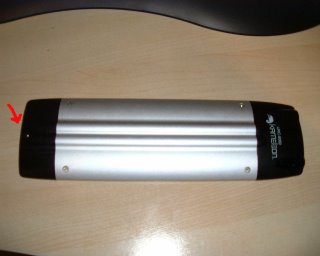
1. Remove the battery compartment screw (red arrow) and remove the batteries.

To enlarge the picture, click on it
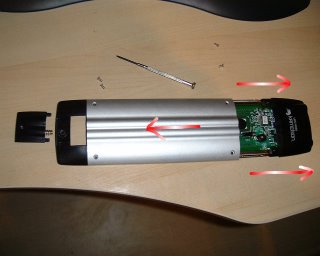
2. Remove the four remaining screws.
3. Slide the infrared head and motherboard out from the aluminium case. This is best done by holding the infrared head end (plastic bit) by the sides and holding the aluminium case in the other hand and pulling gently apart.

To enlarge the picture, click on it
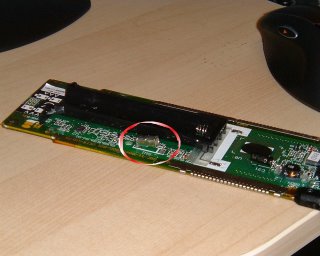
4. Once out, look at the motherboard side with the battery compartment on, and you will see a square silver bullet shaped vibration sensor on the right-hand side of the battery compartment (marked SW1)

To enlarge the picture, click on it
All you need do is snip one of the ends (it doesn't matter which) with some snipping device of your choice. I am a professional, so I used nail scissors ;-)
Once snipped, just make sure that the silver bullet can't touch the other half of the bit you snipped. If you want to be really sure this can't happen, snip BOTH ends of the vibration sensor and remove the silver bullet completely.
Jobs a good'un !!
Reconstruct the remote control and bob is your uncle.
I don't know how long the remote control retains your settings, but I had it apart for how ever long it took to do the above and all my settings were retained ! And that's me not knowing what I was going to snip at the time.
Good Luck
If you're stuck, you can add a comment to this blog and I will try and respond.
I made a brief post many moons ago on some forum about how to disable the motion sensor on the Kameleon Remote Controls. Subsequently, I received many emails asking me for more details on this.
PLEASE NOTE
I DO **NOT** TAKE RESPONSIBILITY FOR ANY DAMAGE THAT YOU MAY CAUSE TO YOUR KAMELEON REMOTE CONTROL SHOULD YOU CHOOSE TO PERFORM ANY OF THE FOLLOWING ACTIONS !
One of the main problems with this excellent remote control if it is far too sensitive and it lights up with the least vibration, so much so, it drastically reduces battery life. I think I used to get 1-2 months before my batteries needed changing.
I made the change I am about to describe to my Kameleon 8060 and my battery life has dramatically improved. In fact, I can't remember when I last changed the batteries (12 months+).
The kameleon has a built-in vibration sensor that I disabled. This means it ONLY lights up WHEN you push a button. It stays lit for the usual 5 seconds or so, before going out again. It's a much better solution than the frequent battery changes !
So.......................
Here's what to do...............
1. Remove the battery compartment screw (red arrow) and remove the batteries.

To enlarge the picture, click on it
2. Remove the four remaining screws.
3. Slide the infrared head and motherboard out from the aluminium case. This is best done by holding the infrared head end (plastic bit) by the sides and holding the aluminium case in the other hand and pulling gently apart.

To enlarge the picture, click on it
4. Once out, look at the motherboard side with the battery compartment on, and you will see a square silver bullet shaped vibration sensor on the right-hand side of the battery compartment (marked SW1)

To enlarge the picture, click on it
All you need do is snip one of the ends (it doesn't matter which) with some snipping device of your choice. I am a professional, so I used nail scissors ;-)
Once snipped, just make sure that the silver bullet can't touch the other half of the bit you snipped. If you want to be really sure this can't happen, snip BOTH ends of the vibration sensor and remove the silver bullet completely.
Jobs a good'un !!
Reconstruct the remote control and bob is your uncle.
I don't know how long the remote control retains your settings, but I had it apart for how ever long it took to do the above and all my settings were retained ! And that's me not knowing what I was going to snip at the time.
Good Luck
If you're stuck, you can add a comment to this blog and I will try and respond.