How to dramatically increase the battery life of your Kameleon Remote Control
PLEASE READ THIS WEBPAGE IN FULL BEFORE MAKING ANY ALTERATIONS.
I made a brief post many moons ago on some forum about how to disable the motion sensor on the Kameleon Remote Controls. Subsequently, I received many emails asking me for more details on this.
PLEASE NOTE
I DO **NOT** TAKE RESPONSIBILITY FOR ANY DAMAGE THAT YOU MAY CAUSE TO YOUR KAMELEON REMOTE CONTROL SHOULD YOU CHOOSE TO PERFORM ANY OF THE FOLLOWING ACTIONS !
One of the main problems with this excellent remote control if it is far too sensitive and it lights up with the least vibration, so much so, it drastically reduces battery life. I think I used to get 1-2 months before my batteries needed changing.
I made the change I am about to describe to my Kameleon 8060 and my battery life has dramatically improved. In fact, I can't remember when I last changed the batteries (12 months+).
The kameleon has a built-in vibration sensor that I disabled. This means it ONLY lights up WHEN you push a button. It stays lit for the usual 5 seconds or so, before going out again. It's a much better solution than the frequent battery changes !
So.......................
Here's what to do...............
1. Remove the battery compartment screw (red arrow) and remove the batteries.
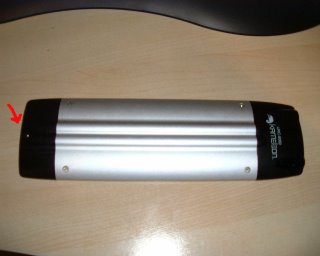
To enlarge the picture, click on it
2. Remove the four remaining screws.
3. Slide the infrared head and motherboard out from the aluminium case. This is best done by holding the infrared head end (plastic bit) by the sides and holding the aluminium case in the other hand and pulling gently apart.
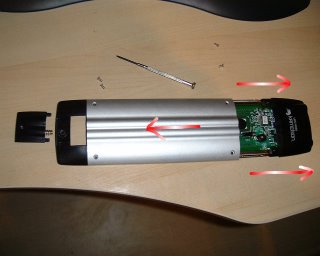
To enlarge the picture, click on it
4. Once out, look at the motherboard side with the battery compartment on, and you will see a square silver bullet shaped vibration sensor on the right-hand side of the battery compartment (marked SW1)
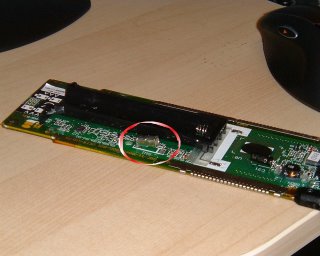
To enlarge the picture, click on it
All you need do is snip one of the ends (it doesn't matter which) with some snipping device of your choice. I am a professional, so I used nail scissors ;-)
Once snipped, just make sure that the silver bullet can't touch the other half of the bit you snipped. If you want to be really sure this can't happen, snip BOTH ends of the vibration sensor and remove the silver bullet completely.
Jobs a good'un !!
Reconstruct the remote control and bob is your uncle.
I don't know how long the remote control retains your settings, but I had it apart for how ever long it took to do the above and all my settings were retained ! And that's me not knowing what I was going to snip at the time.
Good Luck
If you're stuck, you can add a comment to this blog and I will try and respond.
posted by David Pollard at 3:47 PM
![]()
22 Comments:
Thanks that trick worked like a treat!
Thanks for this fix. My remote was headed for the woodpile until I stumbled on this fix. Cut the sensor out, and it works great. Finally, something completely useful on the internet!!
I can't believe it! The motion sensor was driving me crazy!
Great fix thank you so much!
Hi there would you know if the kameleons sold in the uk, for example the 8204/8206/8210, will work in canada? thanks in advance.
I don't see why not ?
I would check the list of supported devices and check that tallies with what you have back in Canada.
Hope that helps !
Top man !
This has been driving us mad for years !
cheers !
Just made the mod - worked like a charm!
You are the MAN!!!
I was ready to chuck not one, but two of them. This remote solved years of multiple remote probs. But brought the stock up for all the battery companys.The snip did the trick. Cant thank you enough!
I performed this modification before discoveing your blog based on similar instructions on remotecentral.com, however, sniping one of the leads did not disable the sensor, bizzare as that seems.
I took a very small, flat -bladed screwdriver, and was able to pry the little box off the circuit board and then simply pulled it off completely.
Unfortunately, and to my surprise, this hasn't improved the battery life!
YOU ARE A GENIOUS! I have had this remote for about 4 years now and love it to death. I dazzle my friends with it's features and they all think I am nuts. But now, I have de-activated the sensor and am thrilled with the idea of saving battery life. Thanks for the info; It was simple and easy to open up, cut and close again.
Thanks, Worked great. I ws about to trash it.
Wouah, thanks for this tip.
I bought this remote perhaps 3 years ago and I really love it, only one thing bore me, the too sensitive light's activation. With a professional tool ;), the problem is fixed.
Thanks.
Sorry for my english :)
Arnaud, Paris - France
Thanks for info, worked fine but the block was soldered in and I had to ease out with pliers by twisting a few times, being careful not to damage the board, came out after a few twist and remote works fine..thank you very much.
thnx very much m8ty, i thought i was going to have to buy shares in duracell :)
happy new year
You're an absolute legend, I love this remote.. but dont love butting the batteries on recharge every other day! Thankyou! :)
Hi I've got one of this remote and it is broken. The Inductor L2 is disrupted and I lost it when I opened the remote, Does anyone know
what is the specification of this L2 inductor so I can buy another one and replace it?
This comment has been removed by a blog administrator.
NICE ONE!!!
just found this,and its a miracle!
battery life got better like never before. thanx holmes!!!! :)
Nice one! Worked like a charm! i hadnt used mine for years because of the battery cost! I stumbled on your website by accident!
Thanks again
Jeff
Absolutely top banana. Now what shall i do with all my rechargeable batteries??
Top Stuff - Thanks !. I have a 4 way kameleon which could be disabled using a code , but this broke and my new 6 way does not support the same code ! Anyway, I always like a hardware solution . :-)
DON'T GIVE YOUR KAMELEON THE SNIP!
Why use this drastic non reversible mod when you can disable it from the keypad, and re-enable it when you want to?
You can buy a dozen decent batteries from the pound store and if you get one to two months on motion setting, that's three to six months use?
Reading the manual you will find:
To change the activation setting:
1. Press and hold the MAGIC key until the rabbit comes out of the hat.
2. Press 9 8 9.
-> If the bottom part of the animated IR Indicator blinks
twice the “EL” panel will be motion activated.
-> If the bottom part of the animated IR Indicator blinks four
times the “EL” panel will be activated by keypress.
Simply perform these steps to lock the KAMELEON 4 to the activation setting that you prefer.
Post a Comment
<< Home